Overview
The Multi-Account Permissions feature enhances the existing Multi-Account functionality by giving administrators full control over user access across multiple accounts.
With this feature, admins can directly manage who can view and access multiple accounts, as well as define account-specific permissions without needing support team assistance in most cases.
Key Capabilities
1. Multi-Account View Access
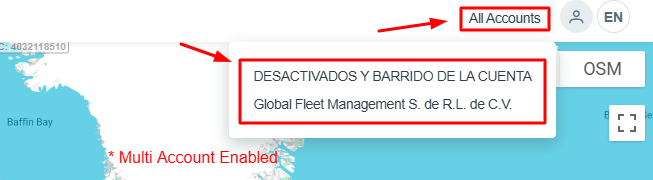
Admins can grant users access to an “All Accounts” view.
-
When enabled, users will see an “All Accounts” option in their Locate profile.
-
This view allows users to:
-
See equipment, geofences, and landmarks across all accessible accounts in a single view.
-
Monitor everything centrally on the Live Map.
-
⚠️ Note:
Editing is not allowed in the “All Accounts” view. Users can only view data.
2. Account-Specific Access Control
Admins can assign users access to specific accounts only.
-
Users will only see and access the accounts assigned to them.
-
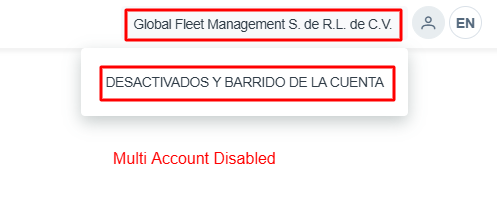
If Multi-Account view is disabled, users:
-
Will not see the “All Accounts” option.
-
Will be restricted to individual accounts they have permission for.
-
Admin Permissions & Requirements
-
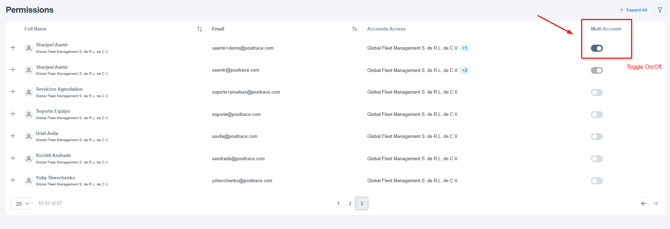
Only Admin users have access to the Permissions page.
-
To modify permissions for a specific account:
-
The admin must also be an admin of that specific account.
-
How It Works
Enabling Multi-Account View
-
Go to the Permissions page.
-
Select the user.
-
Enable Multi-Account View Access.
-
Save changes.
Result:
User can access the “All Accounts” view in their profile.
Step wise Details

-
Go to Account Menu

-
Select Permissions Option
-
Toggle Multi account switch in front of the desired user to enable or disable Multi Account View.
Granting Account-Specific Access
-
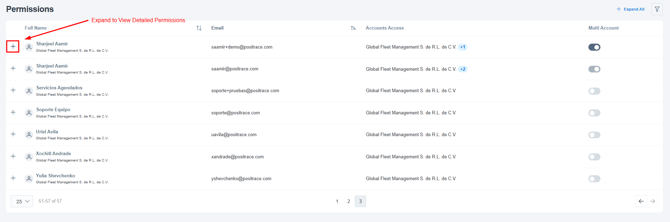
Open the Permissions Form.
-
Select the user.
-
Assign specific accounts.
-
Save changes.
Result:
User can only access the selected accounts.
Step wise Details
-
Go to Account Menu
-
Select Permissions Option
-
Click the Expand button to view the account details for the user.
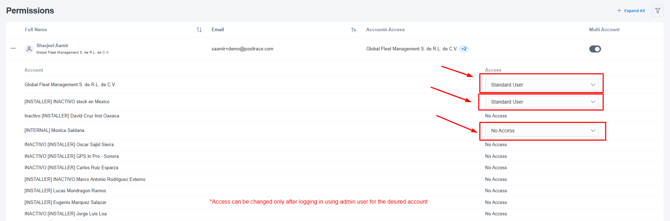
-
Select type of access for each individual account for the selected user.
-
Only Admin can change the access for specific account. The admin needs to have admin type of access for each account for which the access has to be changed.
User Experience Summary
|
Scenario |
User Access |
|---|---|
|
Multi-Account View Enabled |
Can access “All Accounts” view (read-only) + assigned accounts |
|
Multi-Account View Disabled |
Can only access specifically assigned accounts |
|
No Account Access Assigned |
User will not see any account data |
Benefits
-
✅ Full control for admins over user access
-
✅ No dependency on support teams for permission changes
-
✅ Centralized visibility across multiple accounts
-
✅ Improved security with granular access control