
Notification rules tell PosiTrace what to watch for on your fleet and who to tell when it happens — speeding, engine on after hours, a vehicle leaving a geofence, and more. The Notifications screen has been rebuilt as a guided four-step wizard that only lets you build rules your equipment can actually deliver.
What’s new
If you have used Notifications before, here is what changed:
- A four-step wizard. Setup, equipment, condition and subscribers are now separate steps with a progress bar, so you always know what is left to do.
- Two ways to start. Begin with the vehicles you care about (Equipment First) or with the event you want to catch (Event First).
- Only valid choices are offered. The wizard filters events, geography types and delivery channels down to what your selected equipment and account actually support, so a rule can no longer fail at the last step.
- Step-by-step validation. Next stays disabled until the current step is complete, and required fields are marked with an asterisk.
- A faster rule list. Filter by status and switch any rule on or off straight from the list on the left, without opening it.
Where to find Notifications
From the top navigation bar, open Operations and choose Notifications under the Alerts & Security column.
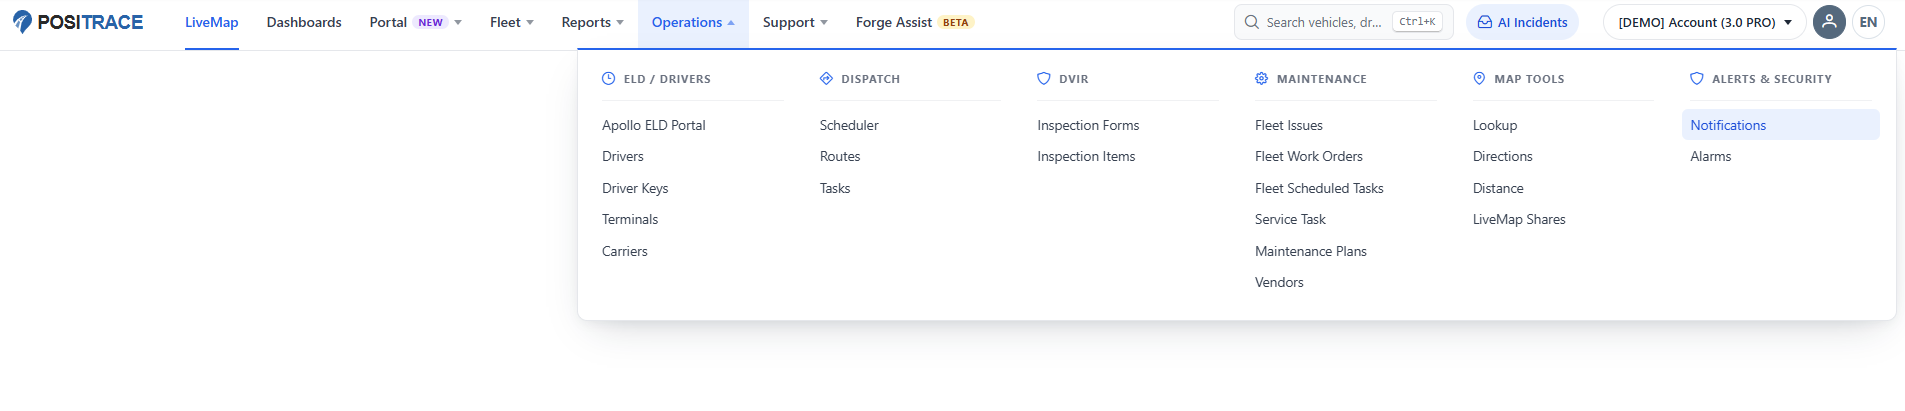
Figure 1. Operations › Alerts & Security › Notifications. Alarms in the same column is a separate feature and is not covered in this article.
|
Tip: Check that the correct account is selected in the account switcher at the top right before you start. A notification rule belongs to the account it was created in. |
The Notification Rules screen
Your existing rules are listed down the left-hand side. From this list you can:
- Add New — starts the four-step wizard for a new rule.
- Filter (funnel icon) — narrows the list. Applied filters appear as chips underneath, with Clear All to reset them. By default the list is filtered to Active rules.
- The toggle on each row — switches a rule between active and inactive immediately, without opening it. Use this to pause a rule instead of deleting it.
Choosing a configuration flow
On the first step you choose how you want to build the rule. Both paths create the same kind of rule and contain the same four steps — only the order of the middle two steps changes.
| Flow | Step order | Best when |
|---|---|---|
| Equipment First | Setup → Equipment → Condition → Subscribers | You already know which vehicles the rule is for — “alert me for these five trucks”. You pick the units, then choose from the events those units support. |
| Event First | Setup → Condition → Equipment → Subscribers | The event matters more than the vehicle — “tell me about every speeding event, on whatever can report it”. You pick the event, then choose from the equipment that supports it. |
|
Recommended: If your fleet mixes device types — OBD trackers, hardwired units, asset trackers — use Event First. It shows you the event catalogue up front and then narrows the equipment list, which avoids the empty-events situation. |
Creating a rule with Equipment First
Click Add New to open the wizard, then follow the four steps below.
Step 1 — Set up the rule
- Notification Rule Name (required) — use something a colleague would recognize in an email subject line, such as After-hours engine on — Yard trucks.
- Status — leave it on Active to start sending as soon as the rule is saved, or set it to inactive if you want to build it now and switch it on later.
- Select Configuration Flow — choose Equipment First.
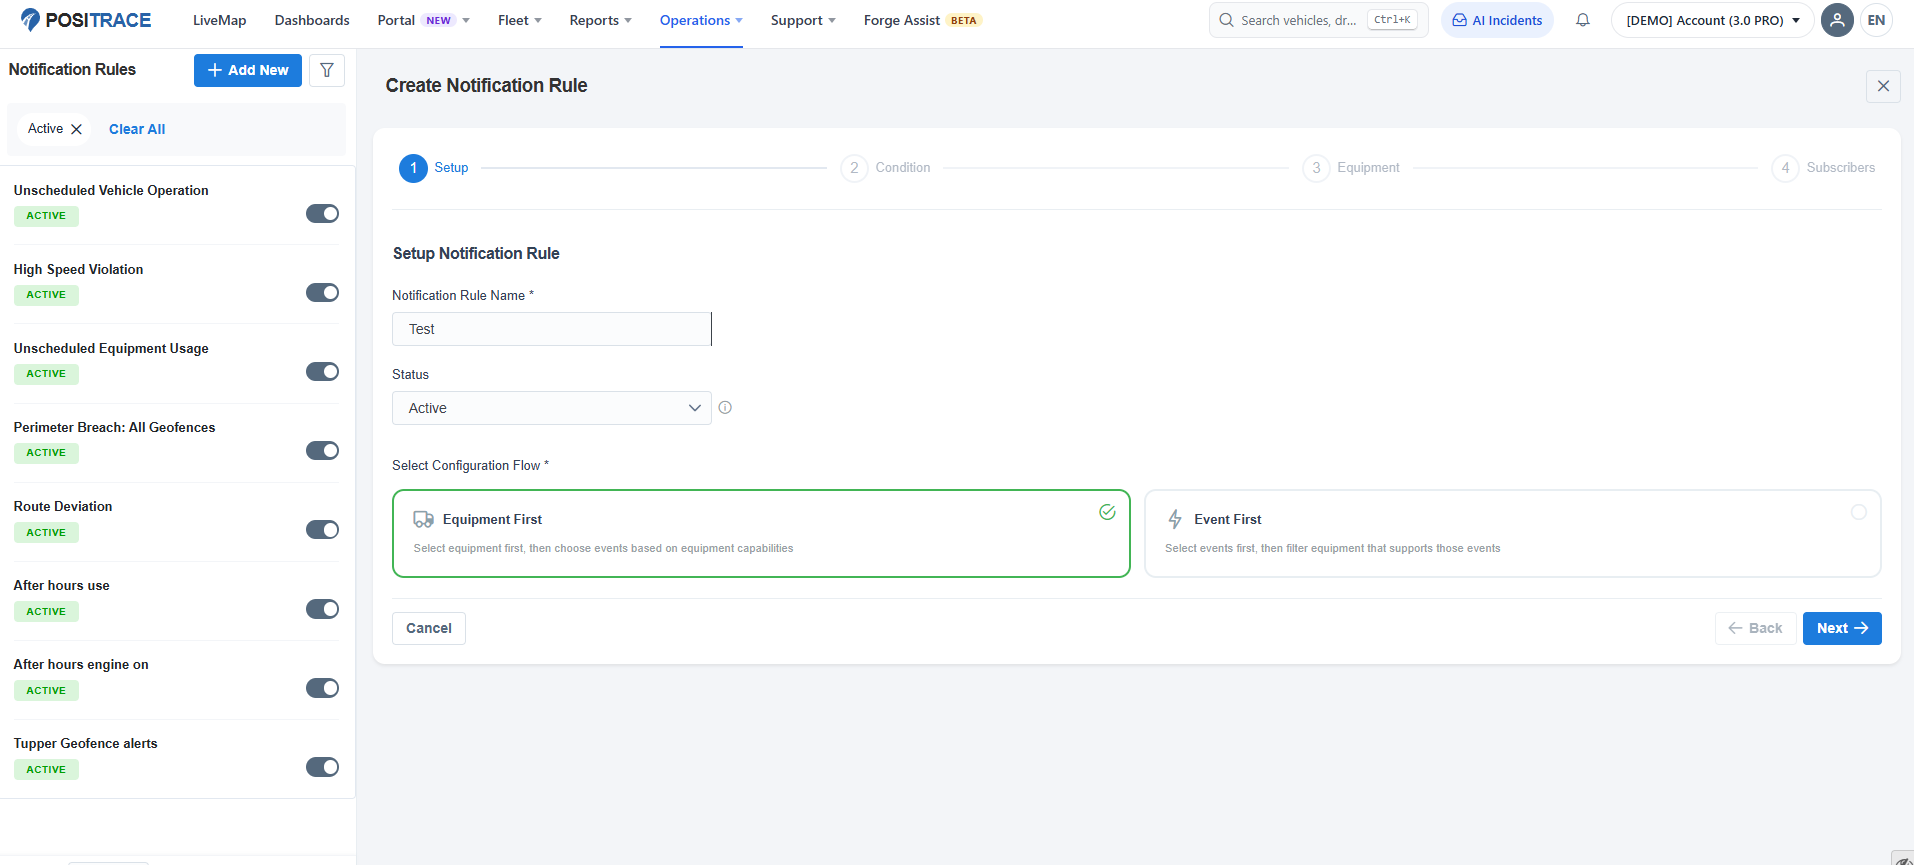
Figure 2. Step 1 — Setup, with Equipment First selected. Note the step order in the progress bar: Setup, Equipment, Condition, Subscribers.
Click Next.
Step 2 — Select equipment
Choose which vehicles or assets the rule applies to.
- Apply to all equipment — covers every unit in the account, including units you add in future. Read the caution below before using it.
- Select Equipment — leave the box unticked to pick units individually. Units are listed under their equipment group, with anything ungrouped in an Ungrouped bucket. Tick a group name to select everything in it, or use the search box to find a unit by name.
The small icons to the right of each unit show which delivery channels that unit supports — mobile app, email and Telegram. A unit with fewer icons can send fewer channel types.
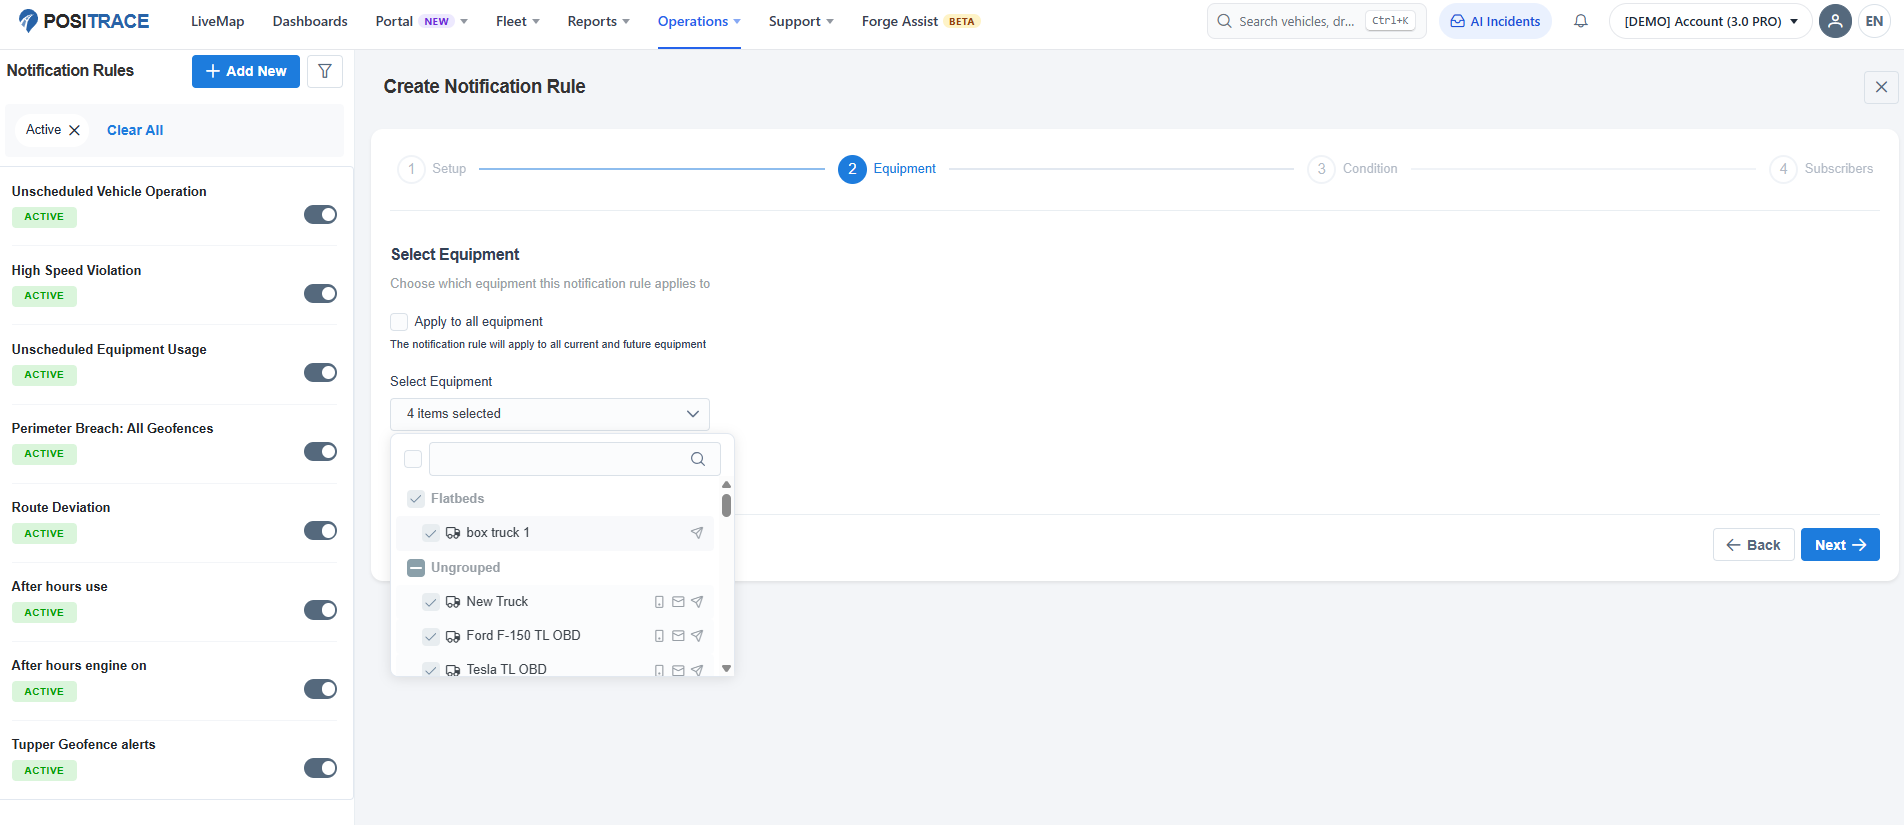
Figure 3. Step 2 — Equipment. Units are grouped, searchable, and annotated with the channels they support.
|
Caution: Apply to all equipment narrows what you can do on the next step. The condition list only offers events that every selected unit can report, so on a mixed fleet the shared list can be very short — or empty. If that happens, come back to this step and select units of one type instead. |
Click Next.
Step 3 — Configure the condition
This is where you define what PosiTrace should watch for.
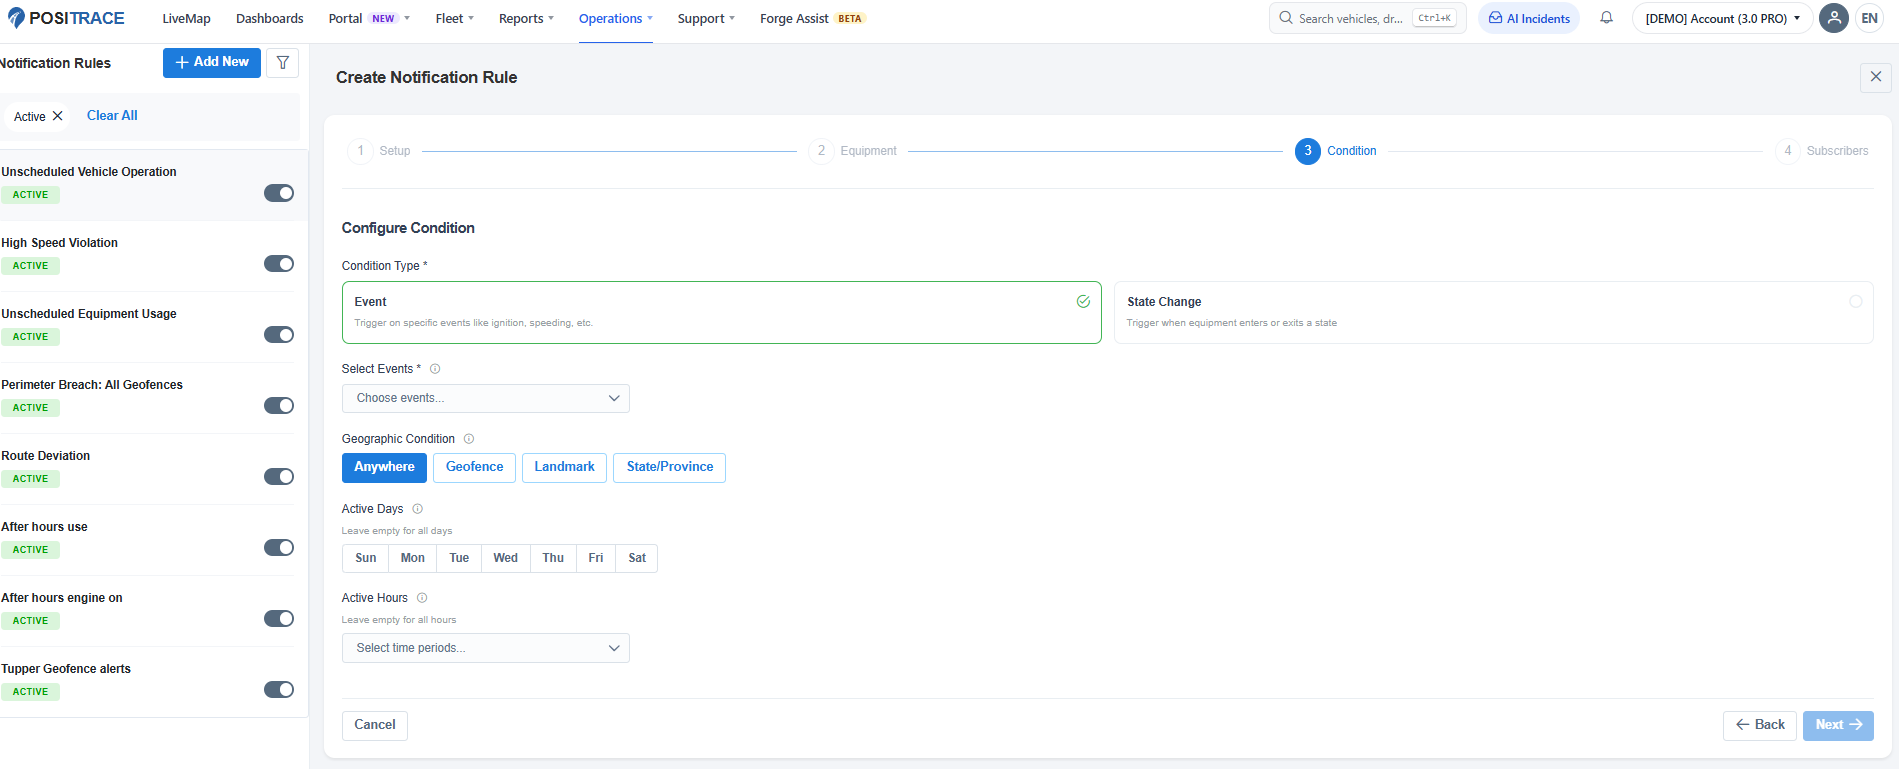
Figure 4. Step 3 — Configure Condition. Next stays greyed out until you have chosen a condition type and at least one event.
Condition Type
- Event — triggers the moment something happens, such as ignition on or a speeding event.
- State Change — triggers when a unit enters or leaves a state, and adds a delay setting so short-lived states do not generate noise.
Select Events
Open the dropdown and tick one or more events. Events are grouped by category — for example Hardware contains Engine On, Engine Off, Speeding and Idling. Use the search box at the top of the list for long catalogues. You can select several events in one rule.
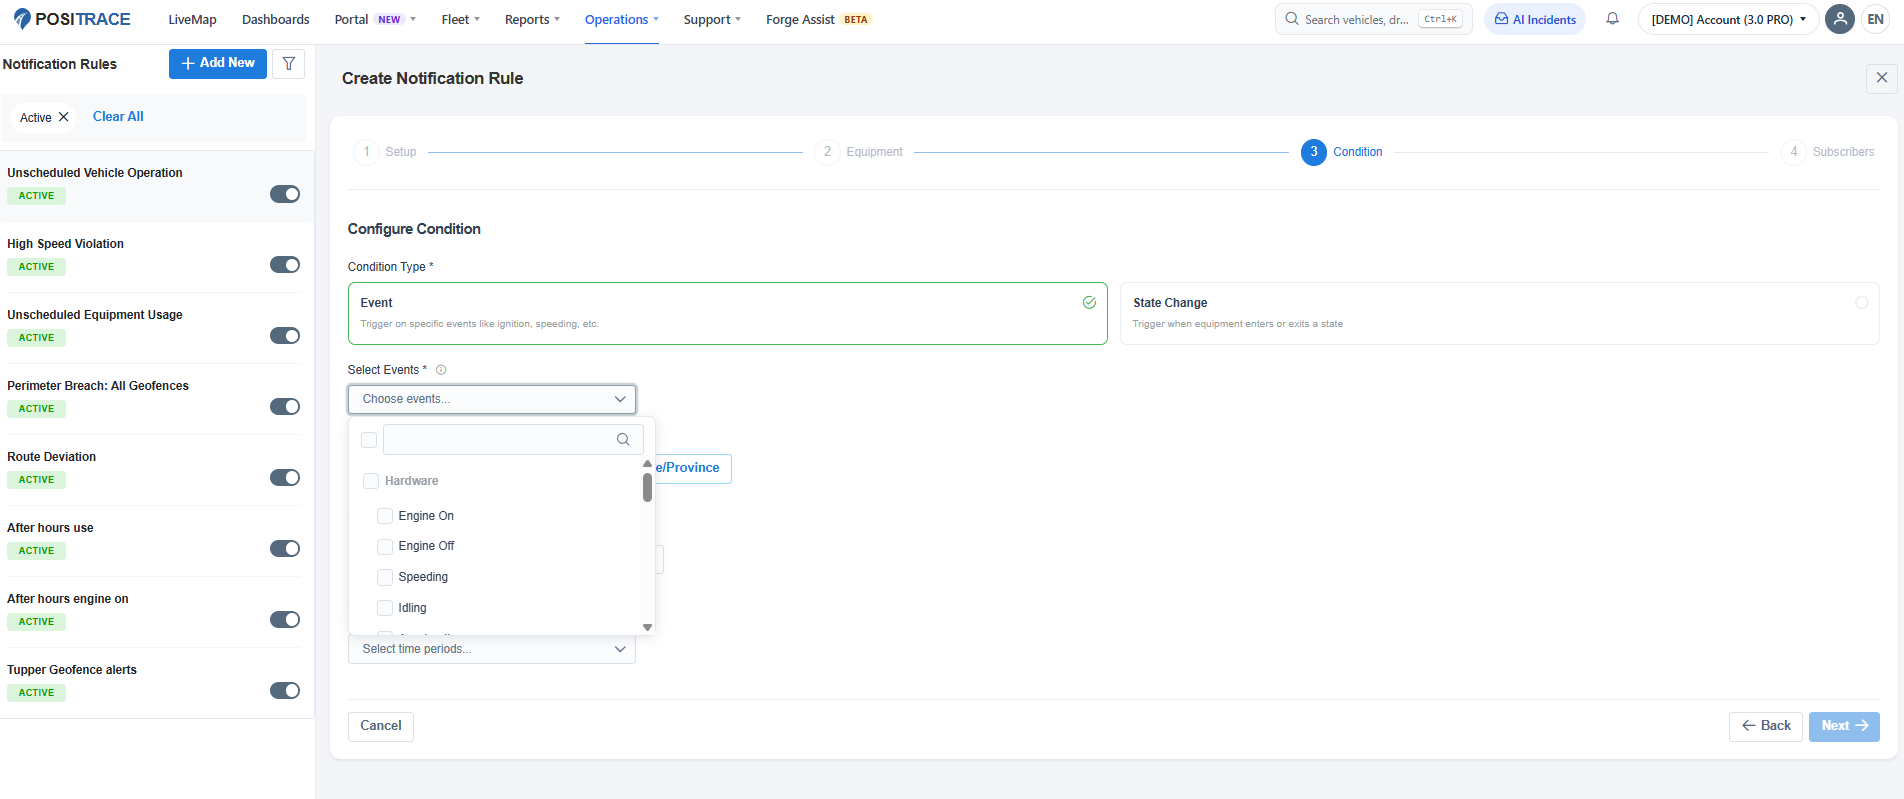
Figure 5. The events list is grouped, searchable and multi-select. Which events appear depends on the equipment you selected in step 2.
Geographic Condition
- Anywhere — the default; location is ignored.
- Geofence, Landmark, State/Province — restrict the rule so it only fires inside the areas you choose. Availability depends on the features enabled on your account, so you may not see all four options.
Active Days and Active Hours
Use these to limit a rule to a schedule — weekdays only, or overnight, for example. Leave both empty to cover all days and all hours. Active Hours is a multi-select list of time periods, so you can combine blocks such as 1 AM - 2 AM and 2 AM - 3 AM.
Notification Settings — Delay Before Triggering
When State Change is the condition type, a Delay Before Triggering (seconds) field appears. The state has to hold for that long before you are notified. The default is 300 sec (five minutes), which is a good starting point for conditions such as idling.
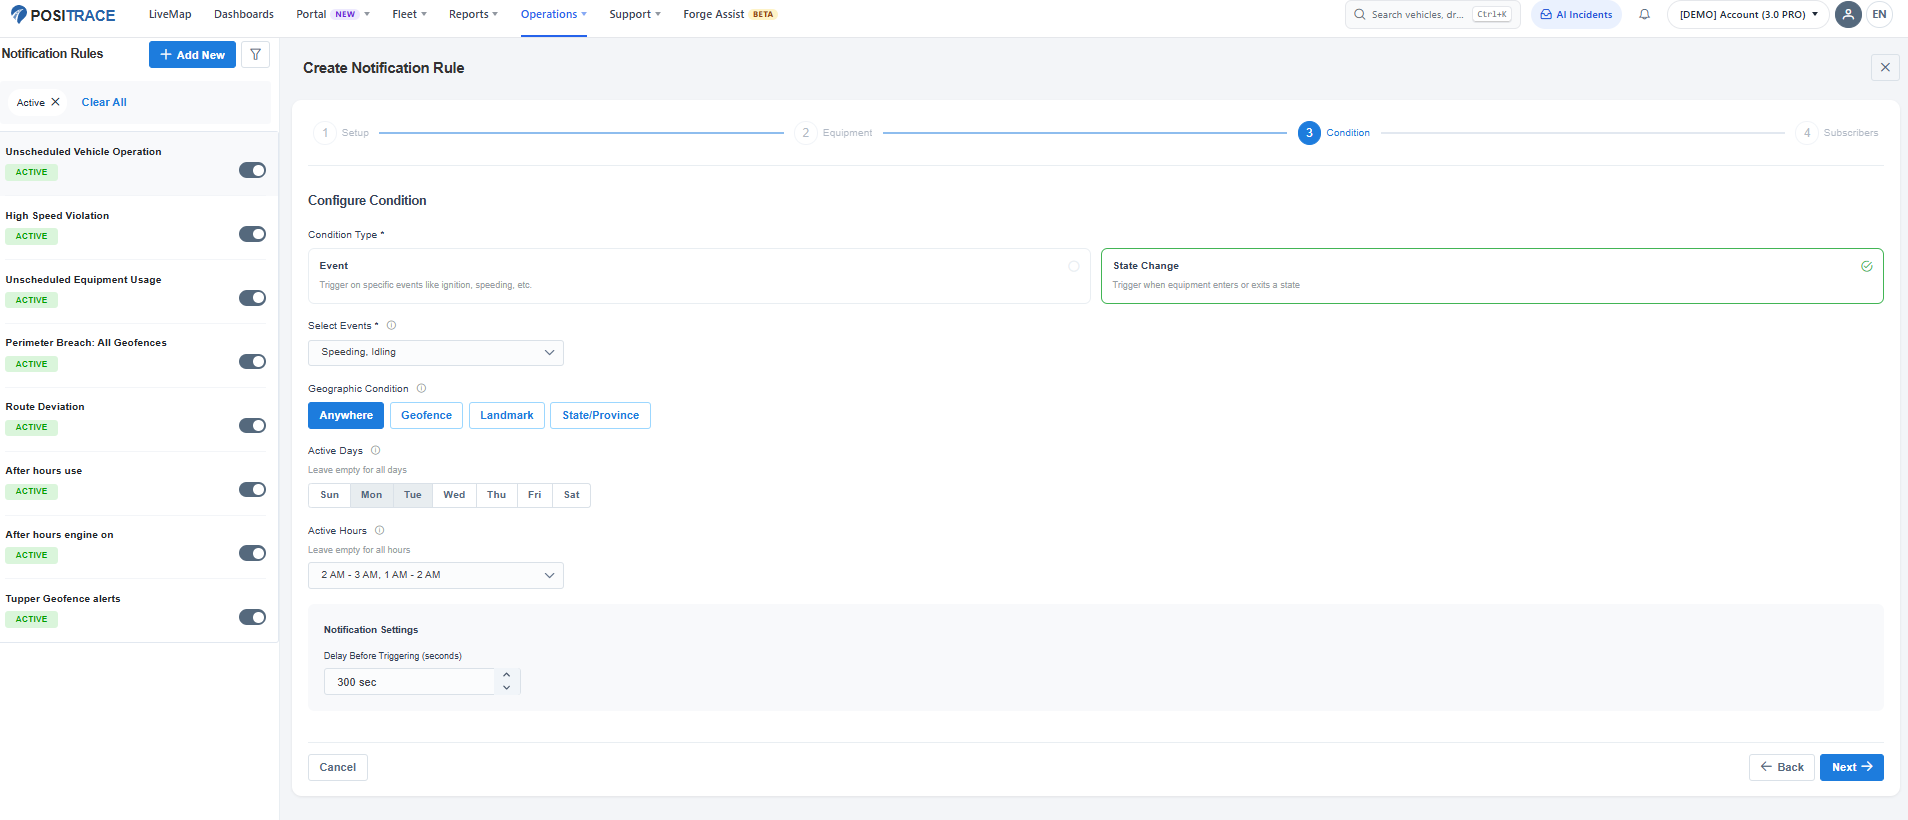
Figure 6. A State Change condition with a 300-second delay. Raise the delay if a rule is too chatty; lower it if you need to hear about things sooner.
Click Next.
Step 4 — Choose subscribers
Decide who is told, and how. Four channels are available:
- Email Notifications — select one or more users.
- Mobile App Notifications — free push notifications to the PosiTrace mobile app. App Store and Google Play links are shown for anyone who has not installed it yet.
- SMS Notifications — text messages. SMS is a paid channel and is not enabled on every device.
- Telegram Notifications — delivery to a linked Telegram account.
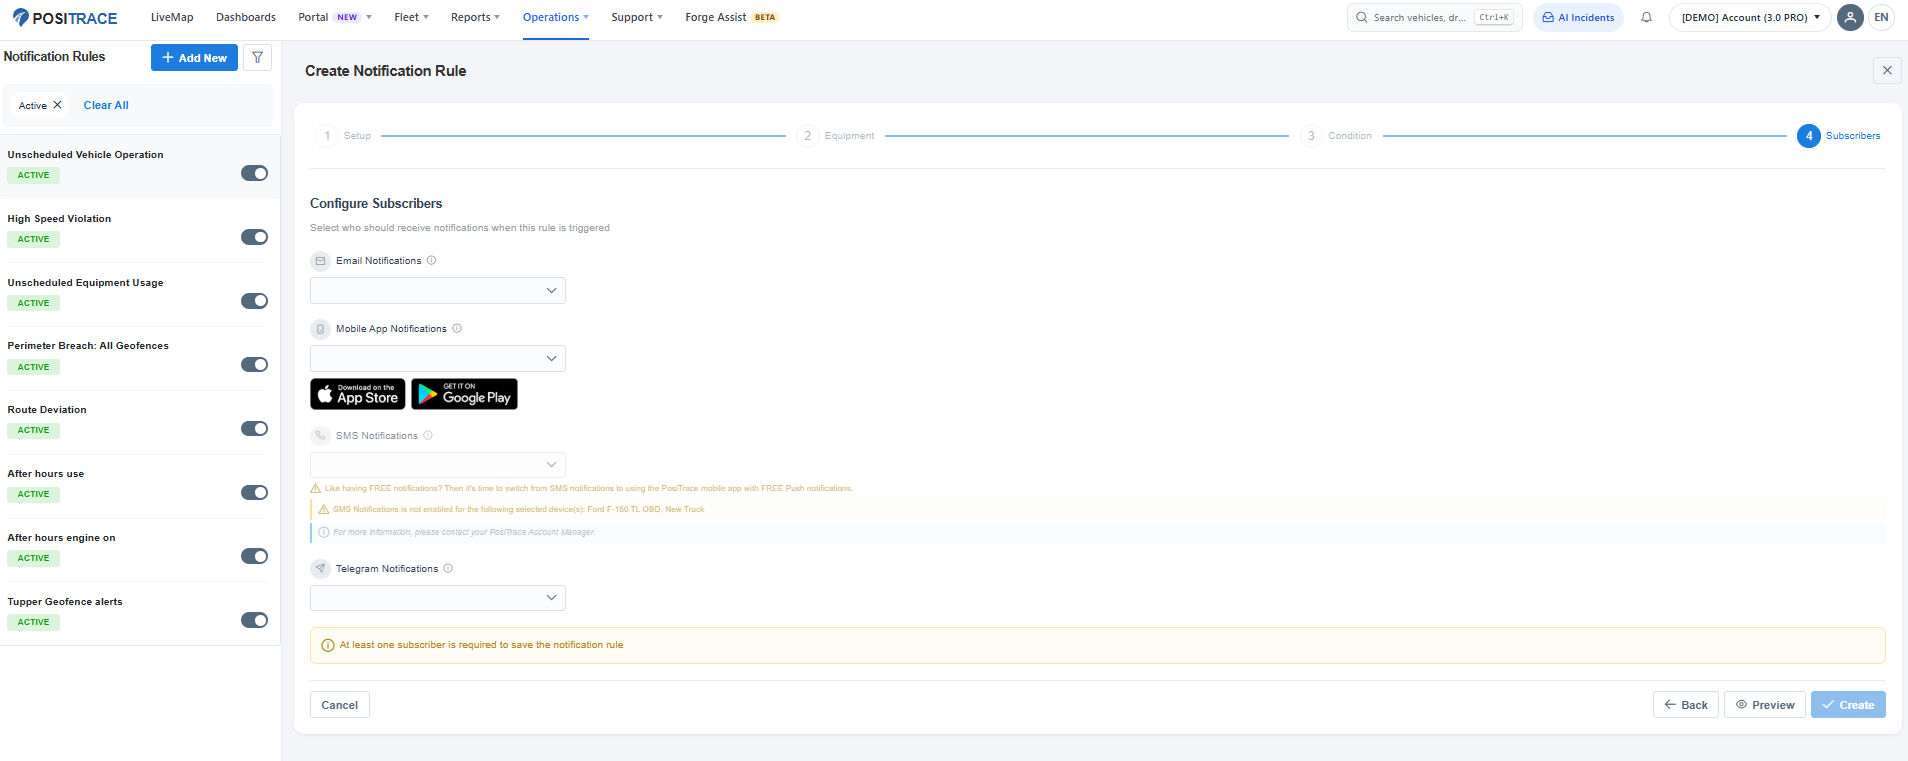
Figure 7. Step 4 — Subscribers. The inline notice names the exact devices where SMS is not enabled, so you know which units would be missed.
|
Good to know:
|
Use Preview to review the whole rule before committing, then click Create. The new rule appears in the list on the left.
Creating a rule with Event First
The steps are the same, but you configure the condition before the equipment. Use this when you want to see the full event catalogue up front.
Step 1 — Set up the rule
Name the rule, set its status, and choose Event First. The progress bar changes to Setup, Condition, Equipment, Subscribers.
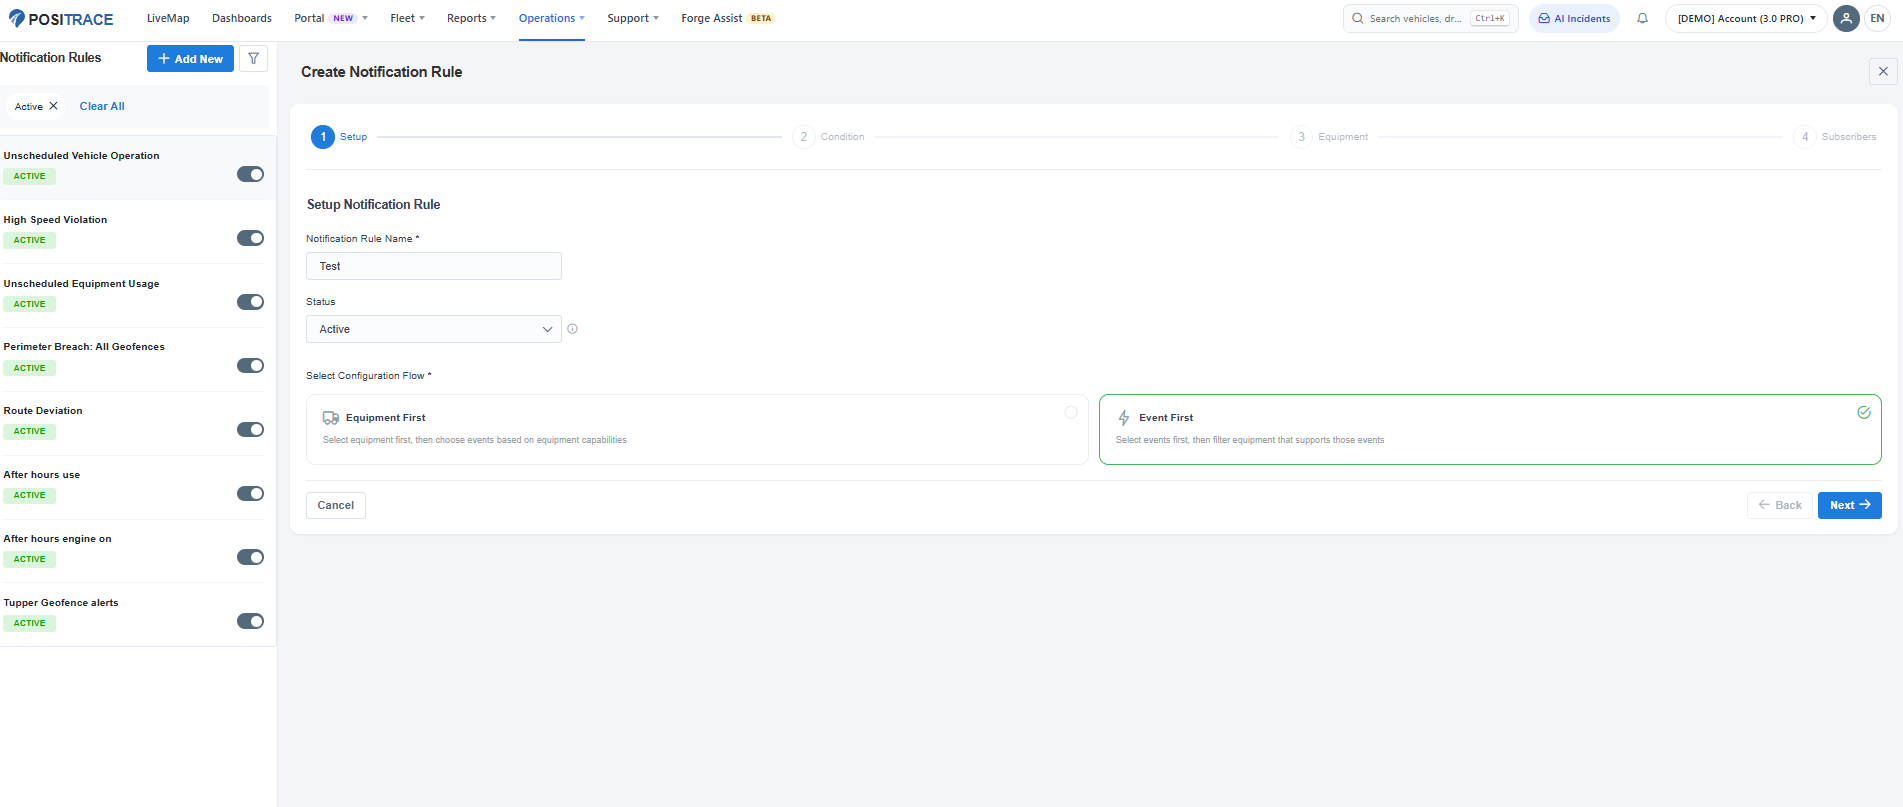
Figure 8. Step 1 with Event First selected — Condition now comes second.
Step 2 — Configure the condition
Choose Event or State Change, pick your events, and set the geographic condition and schedule. All of these fields work exactly as described in step 3 of the Equipment First walkthrough above.
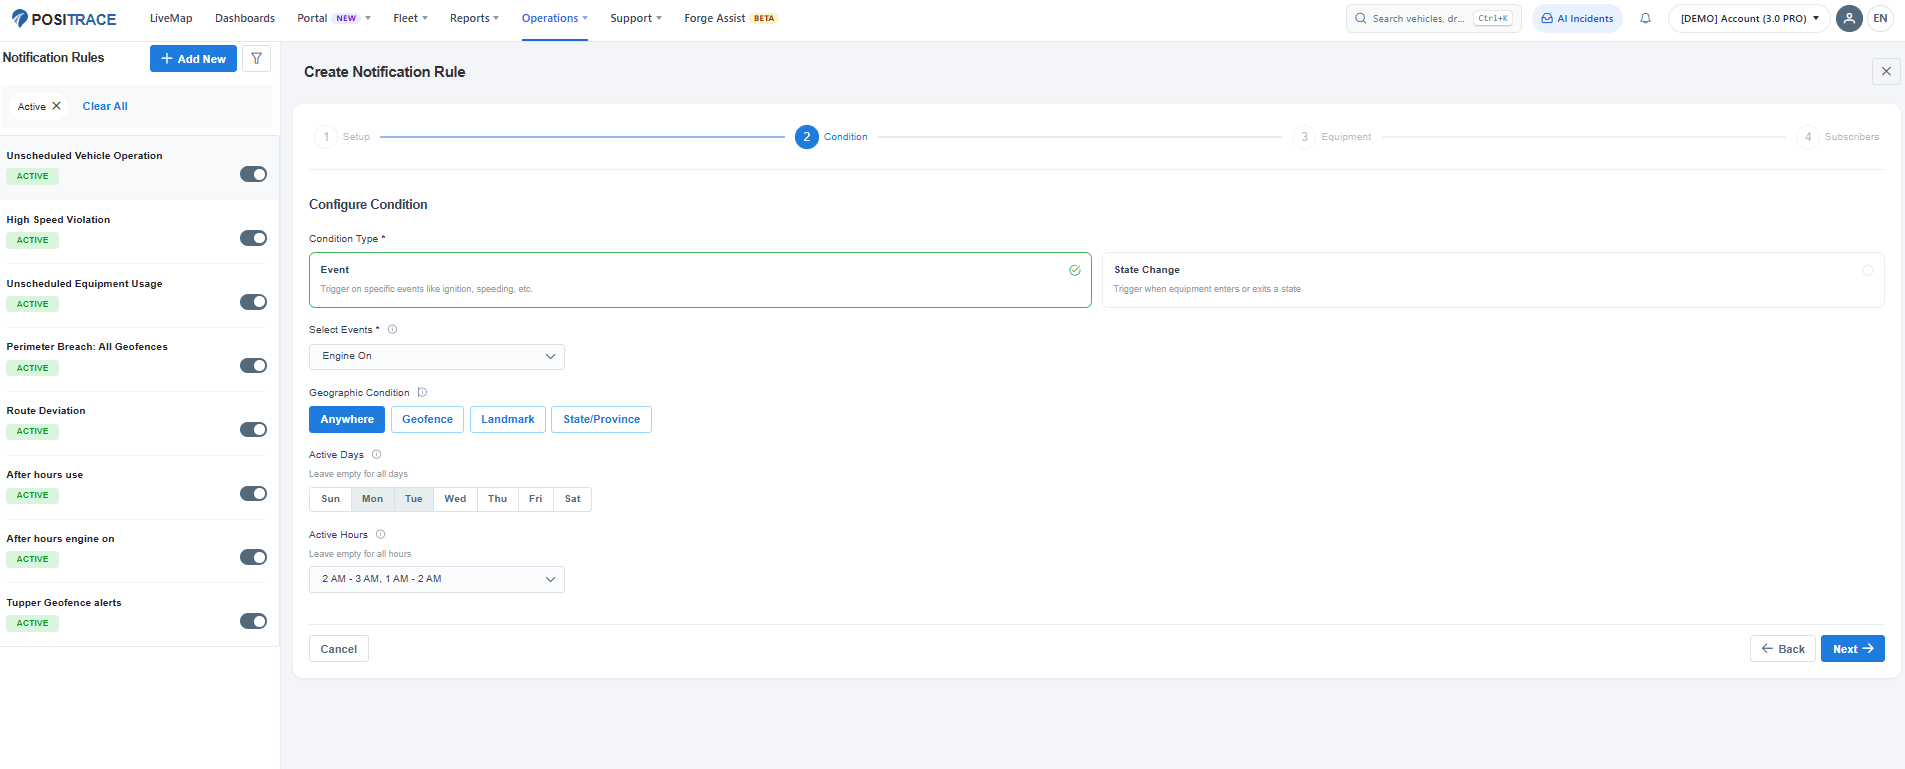
Figure 9. An Event condition — Engine On, anywhere, on the selected days and hours.
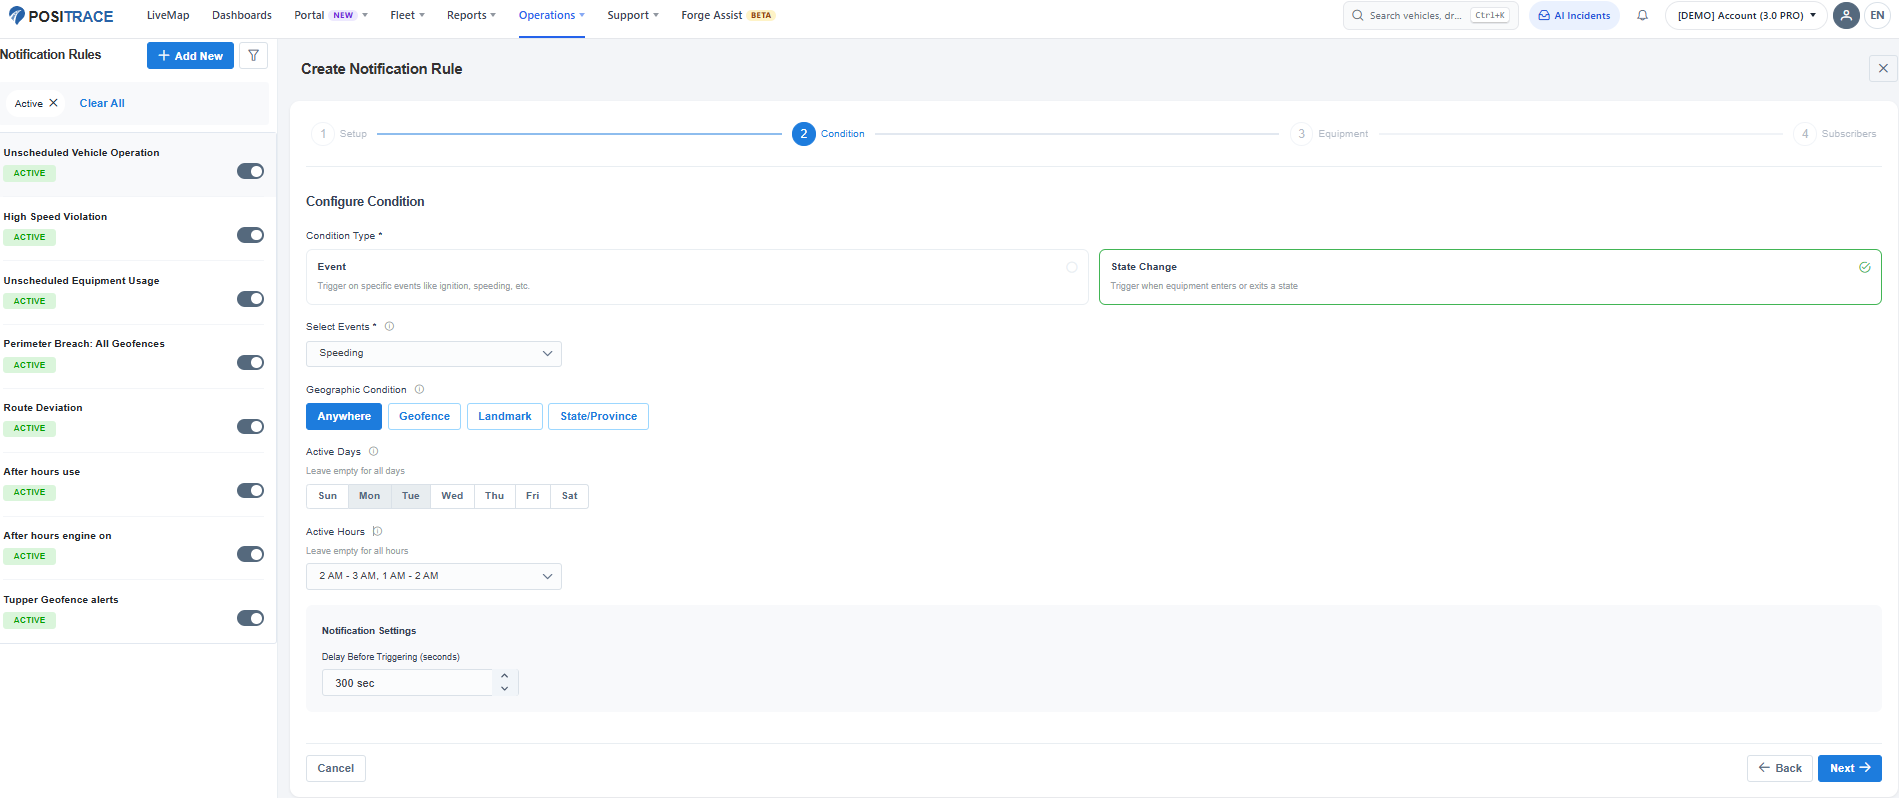
Figure 10. The same step with State Change selected, which reveals Delay Before Triggering.
Step 3 — Select equipment
Now the equipment list is filtered for you: only units that can report the events you chose are offered. Tick Apply to all equipment to cover every current and future unit that qualifies, or clear it to pick units individually.
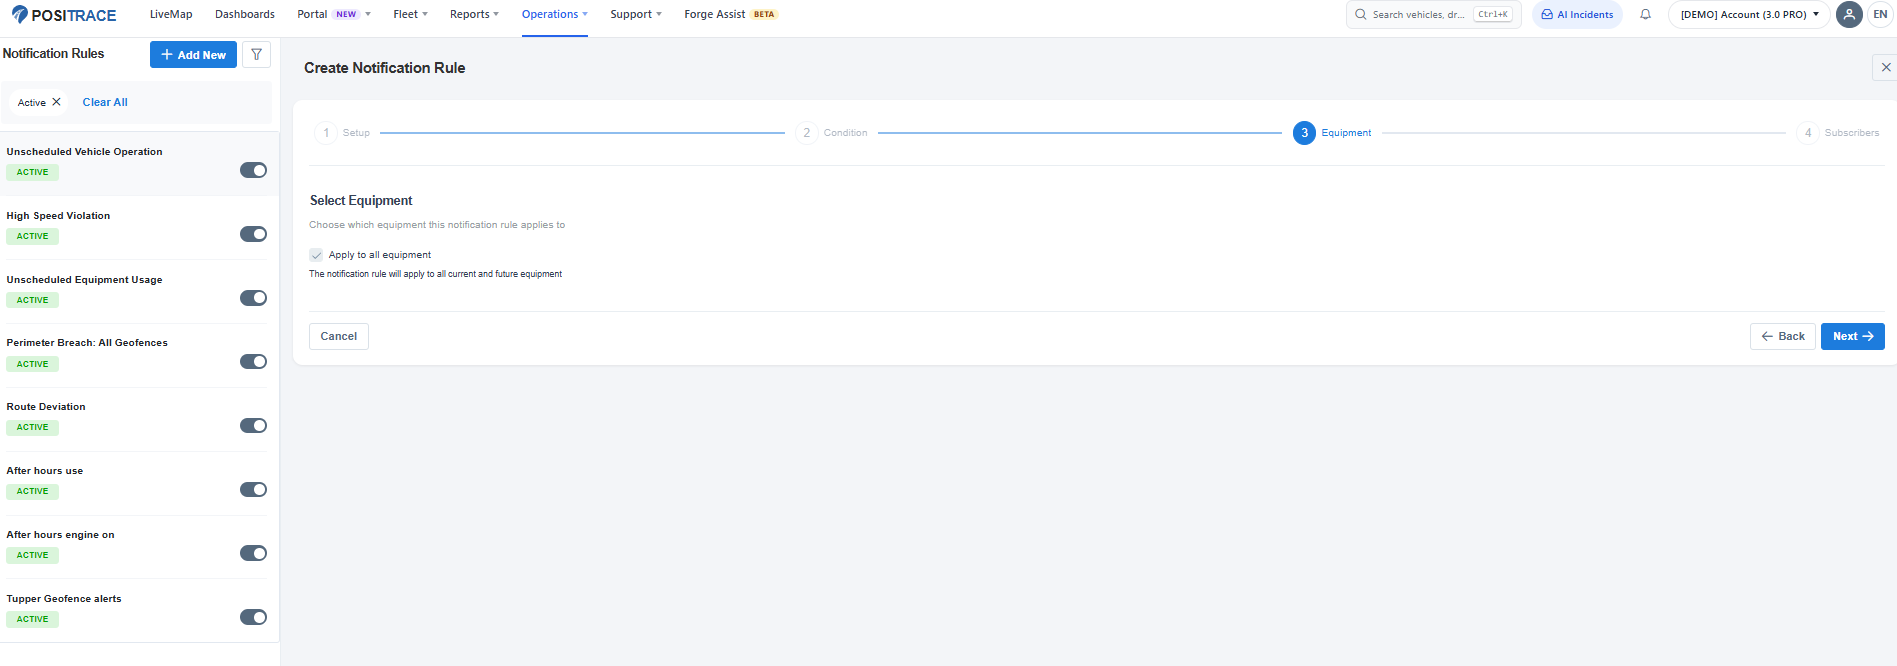
Figure 11. Step 3 — Equipment, with Apply to all equipment ticked. New units added later are covered automatically.
Step 4 — Choose subscribers and create
Identical to step 4 of the Equipment First walkthrough: add at least one subscriber, check any channel warnings, then Preview and Create.
Field reference
| Field | Step | What it does |
|---|---|---|
| Notification Rule Name | Setup | Required. The name shown in the rules list and in the notifications people receive. |
| Status | Setup | Whether the rule sends notifications. Can be changed later from the toggle in the rules list. |
| Configuration Flow | Setup | Required. Equipment First or Event First — sets the order of the next two steps. |
| Apply to all equipment | Equipment | Covers every current and future unit. Narrows the available events to those shared by all units. |
| Select Equipment | Equipment | Individual units, grouped by equipment group and searchable. Icons show supported channels. |
| Condition Type | Condition | Required. Event (fires on an occurrence) or State Change (fires on entering or leaving a state). |
| Select Events | Condition | Required. One or more events, grouped by category. Limited to what the selected equipment supports. |
| Geographic Condition | Condition | Anywhere, Geofence, Landmark or State/Province. Options depend on your account features. |
| Active Days | Condition | Days the rule is armed. Empty means all days. |
| Active Hours | Condition | Time blocks when the rule is armed; multiple blocks allowed. Empty means all hours. |
| Delay Before Triggering | Condition | State Change only. How long the state must hold before you are notified. Default 300 seconds. |
| Email, Mobile App, SMS, Telegram | Subscribers | Who is notified on each channel. At least one subscriber is required to save the rule. |
If the events list is empty
You reach the condition step, open Select Events, and see No results found — with no condition types to choose from either.
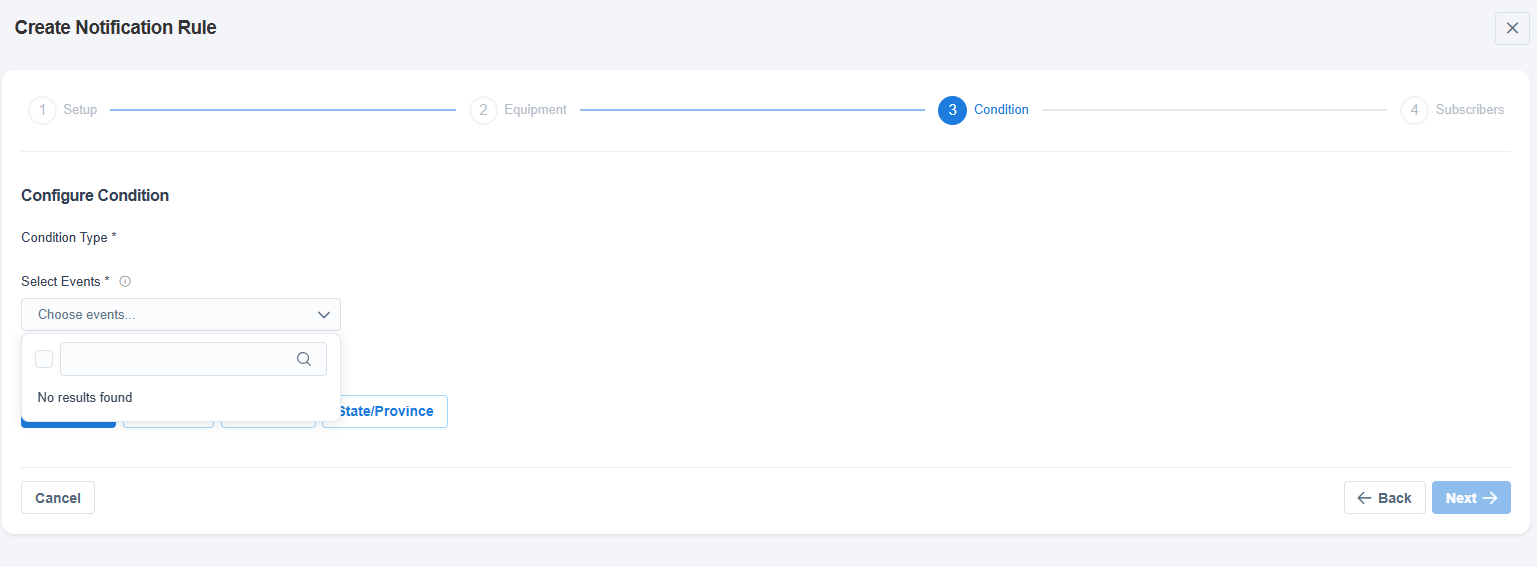
Figure 12. An empty events list. This is the wizard protecting you, not a fault.
|
Why this happens: The condition list only offers events that every selected unit supports. When Apply to all equipment is ticked and your fleet is a mix of device and equipment types, there may be no event common to all of them — so the list comes back empty. |
How to fix it
- Click Back to return to the Equipment step.
- Clear Apply to all equipment.
- Select units of the same type — or start with a single unit to see its full event catalogue.
- Click Next. The available events now appear.
- Repeat for each equipment type, creating one rule per type. Give them matching names, for example Speeding — OBD units and Speeding — hardwired units.
|
Avoid it next time: Start the rule with Event First instead. You choose the event up front and PosiTrace narrows the equipment list to the units that support it, so you never hit an empty list. |
Managing existing rules
- Pause or resume a rule — use the toggle on the rule’s row in the list. The change takes effect straight away.
- Edit a rule — open it from the list. It reopens in the same four-step wizard with your settings loaded, and the same validation applies. If you change the equipment, re-check the condition step: your saved events may no longer be supported by the new selection.
- Find a rule — use the filter icon next to Add New. Applied filters show as chips, and Clear All removes them.
|
Tip: Pausing a rule keeps its configuration and subscribers. Prefer pausing over deleting for seasonal rules, such as a winter yard curfew. |
Frequently asked questions
Can one rule cover several events?
Yes. Select Events is multi-select, so a single rule can watch for speeding and idling together. The notification tells you which event fired.
Why can I see fewer events than a colleague?
The event list reflects the equipment selected in that rule. Different vehicles carry different devices, and different devices report different events.
Why is SMS greyed out for some vehicles?
SMS is enabled per device. The subscribers step lists the specific devices where it is not enabled — contact your PosiTrace Account Manager to have it turned on. Mobile app push notifications are free and cover the same need.
I am getting too many notifications from one rule. What should I change?
Three levers, in order of impact: raise Delay Before Triggering for state-change rules, narrow Active Days and Active Hours to the hours you care about, and set a Geographic Condition so the rule only fires in the areas that matter.
Do new vehicles get covered automatically?
Only if the rule uses Apply to all equipment. Rules built from an individual selection do not pick up units added later, so review them when you expand the fleet.
Why is Next greyed out?
A required field on the current step is still empty. Required fields are marked with an asterisk — on the condition step that means a condition type and at least one event.
Still need a hand?
Contact PosiTrace Support or your Account Manager and include the rule name, the equipment involved, and which step you are stuck on — that gets you an answer fastest.