
Package Contents
Each package contains the following accessories:
|
1. Camera |
6. Wire Harness |
|
2. Mounting bracket |
7. Alcohol swap |
|
3. Screw x 1 |
8. Crowbar tool |
|
4. Screwdriver |
9. 128 Micro SD card (installed) |
|
5. Power Box |
10. Sim card (installed) |
|
Optional: OBD or JBUS cable for plug-and-play install |
|
Camera Installation
Wiring Overview
Please connect the camera to the Power Box using the rounded connector, and then attach the Wiring Harness to the Power Box. (Wiring harness may be a hardwire harness or optional OBD/JBUS harness)

Mounting Location
Select a suitable location for the mounting bracket, the camera lens should be positioned at the vehicle centerline. The positioning of the camera is critical for correct AI detection. If the camera is installed off-center, please ensure to note this during Measurement calibration, but significant off-center installation can lead to incorrect AI detection.
PosiTrace GPS is not responsible for incorrect AI detection
due to installation issues.
Please note the “UP” orientation text on the camera’s bracket.

Please make sure to orient the mounting plate according to the “UP” indicator. As well, the toothed side of the mounting plate should orient to the right when looking at the driver-facing camera.

Cable Location
Guide the cable along the windshield and tuck it behind weather stripping.


Plug-and-Play installation (optional)
Connect the OBD or JBUS adapter to the relevant OBD/JBUS diagnostic port in the vehicle to power the camera. Common locations of OBD port are shown below:

It is recommended that, where possible, please hardwire your camera if you already use plug-and-play tracking or functionality on a separate GPS or OBD device.
 |
Warning: not all vehicles can support two devices on the same diagnostic port (OBD / JBUS). If you are using a splitter, and you experience issues with tracking or with your vehicle, the camera must be hardwired. |
 |
JBUS Note: If your vehicle’s dashboard displays unusual lights or gauge operation while the camera is plugged into theJBUS port as the only device, please contact our support team as some settings may need adjustment. |
Hardwire installation:
Hardwired installation is recommended, particularly in cases where the OBD port is already in use by an existing OBD-based device, such as a GPS tracker.

|
Black |
GROUND |
|
Orange |
IGNITION |
|
Red |
9V-36V DC |
wiring colors
Ignition: Positive voltage must be provided only when ignition is running, and zero volts when the ignition is off.
- Recommended connection: 3rd (run) position on ignition switch, or fuse panel ignition source if available.
Power: Constant, uninterrupted power is required to operate the camera consistently. At least +12V is recommended, though the camera should continue to operate on as little as 9V of power.
 |
Warning: If you have existing OBD-based devices, do not choose the OBD port as your hardwired power source, as this may lead to power conflicts. |
 |
Note: in the event you need additional or replacement sticker tape for your windshield, outdoor-rated double-sided tape can be purchased from any hardware store. |
Power Take-Off (Optional):
The power take-off feature allows you to connect one of the available PTO input wires to an electrical source for monitoring of additional vehicle equipment. Some examples of this might include:
- Winches or Lifts
- Salt or Sand spreaders
- Doors being open
- Seat Belts that are unbuckled
The trigger for each PTO wire is a High signal (Positive voltage) by default. To enable the PTO feature on your camera, please contact your account manager or our support team.
If you are unfamiliar with vehicle wiring, a 12-volt automotive installer is highly recommended to select the correct source for your PTO wire.
|
Grey |
SENSOR IN1 |
|
Green |
SENSOR IN2 |
Hardwire Harness PTO wiring colors
|
Grey |
SENSOR IN1 |
|
Blue |
SENSOR IN2 |
OBD Harness PTO wiring colors
Camera Calibration - EZ Installer App
- Install the mobile app (called EZ Installer on the Apple App and Google Play stores)
Android: ezInstaller Chenrui Software Development |
 |
|
Apple: |
 |
 |
If you have any issues with the EZ Installer app, please fall back to the Veyes application from the Google Play or Apple store. This application is more complex but is extremely stable. This app is also used for video retrieval. |

Apple: |
|
 Android:
- Press the black button twice (2 clicks in under 2 seconds). The access point is now enabled and the WiFi LED should be solid green.

- Open the EZ Installer application. Click the “Connect” button.
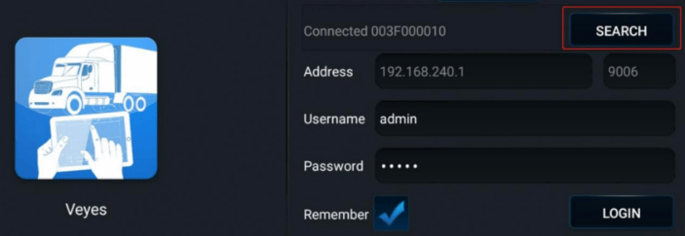
To see screenshots of the Veyes application login screen, please check the Mobile Video Playback section.
- Connect to the WiFi network that is named according to the serial number
(example: Serial num: 00D200732B -> network: ST-00D200732B)
- If prompted: Confirm the notification to stay connected to this WiFi network. Missing this step may prevent your phone from connecting or staying connected to the camera hotspot.

- Enter login details: admin password: admin

- On the Device Status Detection screen, click Next


 Choose CH1 (ADAS) calibration. Enter all Height and Width dimensions in all fields.
Please ensure you select the correct unit of measurement (CM or IN).
Left Margin measurement is critical to correct ADAS AI detection of events and should be measured from the left side of windshield, to the camera lens
- Under Calibration, choose CH2 (the DSC camera or cabin-facing camera) and select the orientation of the driver’s seat side. For the majority of North American vehicles, this will be left.

- There is no need to make any verification of CH3 or CH4 unless additional cameras are present.
- Click “Done” to complete the calibration.
LED Lights

|
Power status LED |
OFF: Device powered down or sleeping |
|
|
Alarm indicator LED |
Off: Device does not generate alarm |
|
|
GPS Signal |
Off: Valid GPS (normal) Steady red: No GPS |
|
|
Network Status |
Off: Connected (normal) Steady red: Not connected / connection abnormal |
|
|
Wi-Fi Status |
Off: Wi-Fi is off |
|
|
Recording Indicator |
Off: Normal operation |
Analog Accessory Camera installation
This guide will explain how to connect any of the Analog Accessory Cameras to the PosiCam | ADP LTE. There are multiple accessory camera models available, and also multiple cable lengths, but they are all installed in the same way.
- Find the rubber cap at the top or back (depending on model) of the camera.

- Once the 10-pin connector is exposed, connect the accessories cable:

 Find your 4-pin extension cable and plug it to the accessories cable connection labelled “VIN” (Video In).

- Connect the accessory camera to the other side of the extension cable.

 |
Warning: There are two identical yellow connectors. Be sure to use the one labelled as “VIN”. |
 |
Warning: Check the accessory camera’s waterproof rating and install accordingly. Even on waterproof cameras you should always try to install them as protected as possible from the environment. |
Mobile Video Playback
In the event you want to find or play back more than a few minutes of video from your camera, we recommend downloading video directly from the camera rather than attempting to retrieve it OTA (Over the Air) which is not efficient for large amounts of data. Please note: using the Veyes app will not provide you files for download, it will only give you access to viewing video.
Veyes App
You will require the VEYES Application from the Apple App or Google Play store.
Tap “Search” in the Veyes application to launch the Wi-Fi Hotspot search, and select the hotspot named by the camera’s serial number (number starts with 00). Follow the same steps for connection as you did during calibration in the EZ Installer application.

Once logged in, select the “Playback” option from the top tab menu.

Choose an available date and then select from the available channels (CH1 is ADAS - Road facing, and CH2 will be Cabin-facing)


Video Playback (iOS, Android)
To watch video while connected to the camera via the Veyes app, select the Play button from the bottom of the screen in the Playback area. This playback area is only available while still connected to the camera.

Video Export
There are multiple options for Video Export:
- Export to Phone (Android Only) via Veyes Application
- Export to USB (Android, iOS) via Veyes Application
- Download to a Laptop or Desktop computer
Export to Phone (Android Only)
 |
Video Export to Phone is only available to be viewed using the Veyes app only. If you require MP4 copies of your videos, please see the File Download area. |
To make a video available for offline playback via the Veyes app, you can instead choose the Video Export option under Playback.

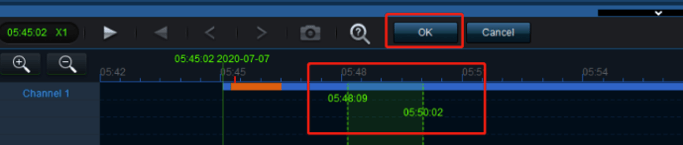
Green area denotes available video. Move your slider into the available area to the desired time. Please be advised the camera records video internally as GMT time and you will need to make this time conversion from your own timezone to find the video you are looking for.
When you have selected the correct start time, click the “Start Time” button.

The “Start Time” button will then change into the “End Time” button. Move the slider again to the desired location and then click End Time to lock it in.

Once End Time is locked in, the button will change to the Video Export button. Please click Video Export, and then select Export to Phone before clicking OK.

 Videos that have been exported to a cell phone can be played back from the main login screen of the Veyes application by clicking the Local Playback option.
You can then click on the resulting file entries to launch the video playback. This video is available even if you are no longer connected to the camera.

Export to USB Stick (iOS, Android)
 You will require a Mini USB OTG Cable Adapter (not included) and a USB storage device
(not included).

Connect the USB stick to the adapter, and the adapter to the camera. Follow steps for Offline Playback (Cellphone) and at the end export phase, select “MP4 video” under “Export to Flash Disk”.
File Download (Computer)
 You will need to remove the SD card from your ADP 2.0 Camera, and you will need access to a
Windows laptop or desktop computer with the CEIBA II software installed.
Using the screwdriver from your camera kit, open the panel on the camera below the lens and remove the SD card in slot TF 1.

Install and run the CEIBA II software. At the login screen, make sure Local is selected. Login credentials are User: admin, Password: blank (nothing entered).
 Double click on the camera’s serial number on the left-hand side, which will launch the calendar. Dates with available videos are marked.
Double Clicking dates on the calendar will launch the video timeline for that day.
|
|
 If the software freezes or appears slow, please wait a couple of minutes, as some computers may take longer than others to load data.
 On the video side of the screen, you will be able to use the Scissors button at the bottom to select a time range.

Clicking Scissors will enable a green dotted outline.
The left dotted line is the start time, the right one is the end time. Double-Click either dotted line and drag to move it, which will adjust the start and/or end time you’ve selected.
When prompted to do so, select the following options in the export window:
- MP4
- Main Stream
- Path: location where you will store your file
- Channels: Make sure to select which channels you want, if you have more than one. Channel 1 (ADAS) faces the road, and Channel 2 (if in use) faces your driver.
In the export window, it is also possible to adjust the start and end time values.

Click OK. The file export will now begin.
 A red number will appear above the arrow in the upper- right-hand corner to indicate a download is in progress. Clicking this arrow will show the download progress.

|
|
 Warning: While the file is downloading, a temporary folder is created in your download folder. While the video export is in progress, do not manipulate the files in that temp folder, as they will eventually be combined to create the final MP4 video.